It’s a pretty big week here in the Wily Hound household. 2 years ago, Justin and I tied the knot and we never looked back.
Until now.
But don’t worry! We’re looking back in a good way.
In honor of the big 0-2, I thought we could spend this week strolling down memory lane; if all goes according to plan, I’ll share some different details of the shindig over the course of the week to keep you fine folks from keeling over due to picture overload.
I thought I kick it off with some wedding prep details. A lot of hard work, sweat and tears went into planning the bash. The tears were mostly from my parents because of the never ending craft projects. The normal course of events usually went as follows:
- Find some sort of “inspiration” in a magazine, on a photographers website or in someone’s blog
- Fall head over heels for it
- Look up how much it would cost to have it custom ordered
- Rage around the house about how much of a rip-off wedding details are
- Figure out a way to DIY that noise, even if its brutally time-consuming, just to spite the wedding industry
Luckily we figured out that this was going to be our method pretty early on so we were able to space the projects out over the course of a few months. I cannot stress enough how imperative that is, so I’ll reiterate it.
Give yourself time to get the projects done, because you will end up resenting your programs at some point and you will need to take some time to step away and get a grip on your crazy.
It also really, really helps if you have incredibly patient parents who are willing to craft right alongside you. And sometimes when you’re at work, just to make the project go by faster.
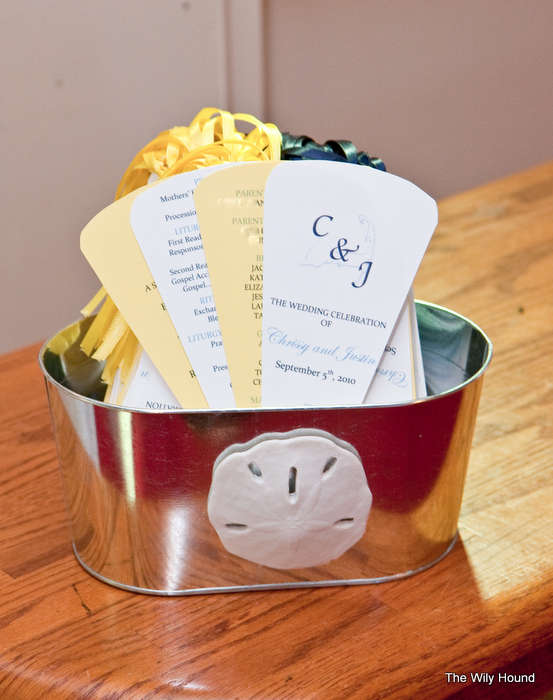
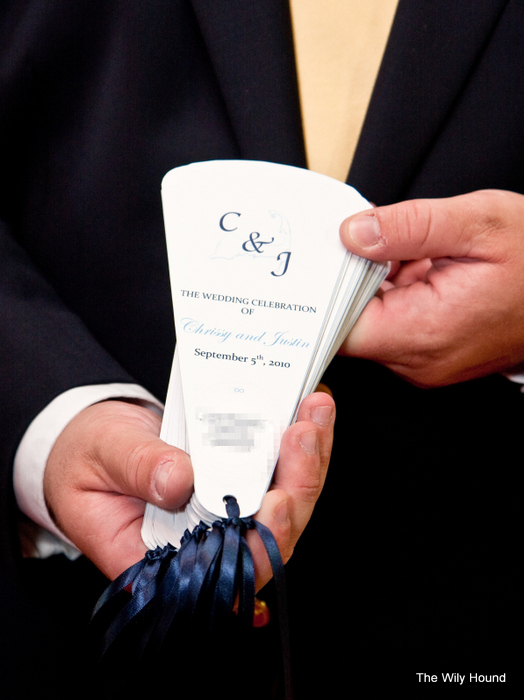
The first project that we started on was the programs. I had seen examples of wedding programs in the form of a fan rather than a booklet, with the information printed on each ‘petal’ of the fan. I thought it was pretty and different – plus, people could use them as actual fans in case the church was especially toasty that day.
Since ordering them from a company was out of the question (see above, re: outrageous wedding prices), I started looking around for some guidance and found it here. There were instructions, recommended tools and paper types, and most importantly: a template.
(Henceforth, those will be referred to as ‘petals’.) All you have to do is download the template, open it in Word and input your info. This proved to be extremely helpful because not only do you have a guide for knowing how much will fit on a line, but you’re also able to print the sheets from your home computer.
I picked up some cardstock from a local craft store and spent a couple of days messing around with the wording, fonts and colors until I came up with something that I liked. I was struggling with the cover because I had a really specific idea in mind; Justin and I were getting married on the Cape and I envisioned an outline of a map of the Cape with our initials inside, but I couldn’t figure out how to make it happen. I was emailing with my (very talented) friend Kathryn (of the 50’s Housewife fame, as seen here) and described what I was looking for. Within minutes she emailed me this and a brief “Will this work?”
Um yes, Kathryn, it will.
From there it was just a matter of figuring out how to cut these bad boys out. After a lot (I repeat: a lot) of trial and error, we figured out that the easiest way to tackle these was to use a combination of a very sharp XACTO knife and very sharp scissors. We cut the straight lines of the individual petals out using the knife and a ruler and then cut the curved top and bottoms using the scissors. Once we got comfortable enough, we stapled a few pages together (to make sure that they stayed even) and then cut them at once. They needed a little cleaning up here and there but they ended up looking surprisingly uniformed.
Once the petals were all cut out, we put them in order, used a hole-puncher on the bottom part and then tied them together with ribbon.
This project might sound incredibly time consuming, and that’s because it was. If anyone has a better way of doing it (that doesn’t include expensive equipment), I would love to hear it.
I know that sounds sassy, but it isn’t meant to be. I’m honestly curious.
That’s why it’s ever so important to give yourself time if you’re going to tackle a project like this. If we had sat down and tried to cram this project into a weekend, we would have either a) given up and burned them all in a fit of rage, or b) done a sloppy job just get it over with. We worked on the petals that included information that we knew wouldn’t change (like the cover and the bridal party) and then left the others to do once everything was finalized (like the ceremony readings and songs). We chipped away at them little by little and we actually ended up kind of enjoying the project. It was an easy, mindless task that proved to be a nice break from the hectic stuff.
I wish I had taken pictures throughout the process, but alas, I didn’t know I would ever be explaining it on a blog. But here is the final product.
photos courtesy of Catharine Morris Photography
As you can see here, the first petal had the Cape logo and the day’s information on it. The second petal had the parents of the bride and groom and the rest of the bridal party, the third petal had all of the information for the ceremony (the readings and songs) and the last petal was a shout out to the vendors like the church’s wedding coordinator, the musicians who played at the ceremony and the officiant.
These were certainly a labor of love, that’s for sure, but I’m really happy with how they came out.
This post ended up being longer than I thought it would be, so I’ll be back tomorrow with some more wedding DIY!


Labor of love? That’s not exactly how I would have described it.
If I recall, you loved putting these together. You did a few extra hundred or so just to keep the good times rolling.
They looked amazing and were so practical! I still pull mine out when I need a breeze on a warm day!
HA! I’m glad you’re still putting it to good use.